
Scrapbooking, Dream Away

DreamAway
 
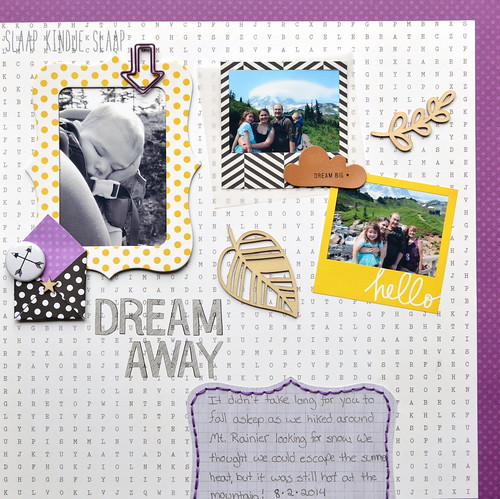
Cheers! It's Monday!  I really need to scrap a lot more photos from 2014.  My kids are growing so fast now.  I was just looking at my daughters hands and I can't believe how big they are getting.  Anywho, I wanted to share this layout I made for the Memory Nest make it Monday
 
MMFeb2015
 
 As you can see, I definitely went on a bit of a journey with this layout.  Mostly, it was because I really had three photos that I wanted to use to tell the story.  So what I ended up doing, was I kind of zoomed out from the layout and expanded on it.  It's kind of a fun challenge to see how you can expand on a layout sketch.
 
DreamAway2

Now that I'm making two scrapbooks, one for each of my kids, I've been trying to challenge my self with different ways on to tell the same story.  This page is clearly for my little guy and how he slept through our entire hike of Mr. Rainier.  I can't wait to make one for my daughter and I'm planning on making it from her view!  It shall be very different.
 
So, I'm still on my purple kick.  With so few embellishments, I decided to make this black and purple dotted mini envelope.  One can never have enough dots!  I was planning on using some purple alphas for my layout, but alas, I didn't have enough A's!

DreamAway4

Comments

  1. Love the journey you took and the purple you have been using!!! Amazing layout. I think it is so neat to see how people interpret layouts for their style and number of pics they have! Fabulous!!! TU!!

    ReplyDelete
  2. Such a cute little envelope - nice touch, must remember that idea! Alphas are such a pain, I sometimes think there should be a big box where you can put unused ones and swap them with other scrappers or maybe manufacturers should just wise up.

    ReplyDelete
  3. Great layout. I like how you framed your photos and that you hand wrote your journalling.

    ReplyDelete

Post a Comment

Popular posts from this blog

Valentine's Day Wreath

Now that the Christmas decorations are down, it is time to make some Valentine's Day decorations to put up! I have seen some in the store, but it is much more fun to make your own.  So here is how I made my sweet heart wreath. First you need a hoop (the one I used had about a 7 in diameter), 7 big wooden hearts, 8 small wooden hearts, paint, glitter, ribbon, and some hot glue. I took all my hearts and painted them a solid color and then went back over them and made some patterns or outlined them. I thought they were looking a little boring so I went back and put some glitter on random ones. Then I went around and hot glued the big ones and tried to make them as evenly spaced as possible. Then I hot glued the smaller ones on top of the bigger hearts, tied some ribbon, and then hung on my door!

Scrapbooking, First Solo

I can't believe how much time has gone by since I last scrapbooked.  Well, I finally have been inspired to scrap again and I found a fun challenge with a very happy mood board that got my creative juices going again. Recently, my daughter got to dance her first solo on a stage.  I had only seen her dance this when she was first learning this.  She had a broken wrist at the time, so I never had seen some of the moves until she danced it on stage.  It had been over a year since she was on a stage and she has never been on one all by herself.  I wasn't sure how she was going to do.  I could tell she was getting nervous, but she did a beautiful job.  I was a very proud mommy.  =)  I really wanted to add one more picture, so I added this photo on a pull out tab.  I always enjoy the pages that have a little interactive part to them. While the paper I used for this layout was all new, all the embellishments are things that I have had for a long time.  I used some old stickers, wooden

Scrapbooking, Adore

    Every once in a while, I make a layout that I absolutely love and this is one of them.  I think it might be the rainbowness of it all that I love.  This is really a random photo of my daughter that I took while we were waiting for the bus.  I played with the photo on my phone and made it more rainbowy.  I really like how it came out, so I printed it out for my project life, but then I decided it needed its own page.  It really is a random page for a random photo.     This is my page for the Memory Nest . The circles on the sketch were my major inspiration.  I felt that they would make a fun background.  At first, I changed the circles to triangles and then I noticed all these old frames on my desk.  I'm a chipboard frame hoarder. lol.  I thought most of the frames were really ugly or they had patterns that I would never use.  At first, I was going to just paint the frames white, but then I decided to make them gray.  I'm glad I made them gray because now they