
Scrapbooking, Splish & Splash

SplishSplash1
 
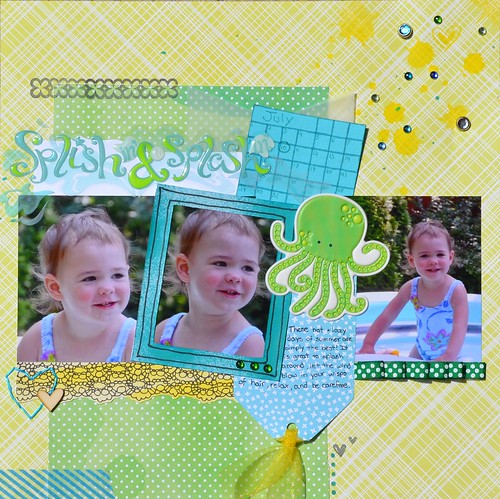
I created this page for the design team call over on the Memory Nest.  The yellow, blue, and green colors remind me a lot of my childhood bedroom, so bright and happy.  My background paper is from echo park's everyday eclectic. I also used up a bunch of scrap paper bits I had from Amy Tangerine.  I really wanted a frame around the middle photo but couldn't find anything that worked so I made it with just some light blue cardstock, a little misting on top of it, and a few doodles.
 
SplishSplash2
 
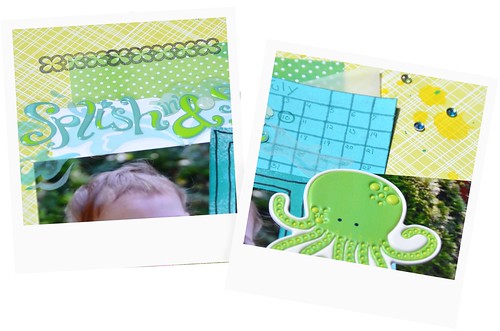
I found the Splish sticker in my stash.  I have had it for years and finally got the chance to use it.  The little blue calendar I made from some plain old blue cardstock.  I also used some misting and some sparkly jewels because they reminded me of bubbles.  I love adding some sparkle to a page!

SplishSplash3
 
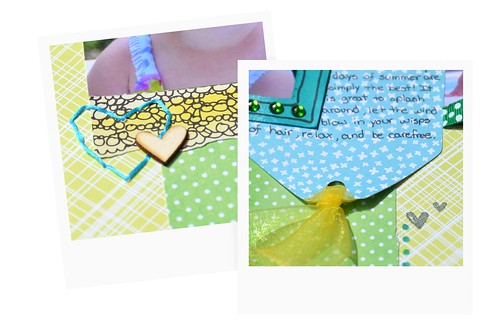
I also added a little stitching with the heart and added a wooden veneer one too.  I have had such a hard time getting my hands on any wooden veneer pieces, but I finally got my hands on some cute hearts and arrows.  No stores by me carry them and all the ones online seem to be out of stock constantly.  I love the look of the raw wood!  I also stamped a few tiny hearts onto the page too.  You can never have too many hearts on a page.

Comments

  1. Beautiful layout. Love the colors. Green and yellow are so pretty but can be so hard to work with. You did a wonderful job.

    ReplyDelete

Post a Comment

Popular posts from this blog

Car Roll Tutorial

  November is such a crazy time.  There are so many projects that have to be made for birthdays and Christmas.  Making things is so much more fun then buying something random.  Anyways, I made this cute car roll for Moose's best buddy's 2nd birthday.  I'm loving how it came out and her friend has been having a blast putting his hot wheels in the little pockets.  So here is how I made it so you can make one too!  I don't have photos for every step because Moose was "helping" me the entire time and I couldn't juggle her and a camera very well.   Supplies: 1/4 of a yard of green fabric 1/4 of a yard of some fun print fabric Batting (about 16 inches by 9 1/2 inches) 5 Pieces of scraps of fabric at are 4 inches by 4 1/2 inches Felt for roads, dirt, and water (I used the felt rectangle pieces you see everywhere in craft stores) Bias Tape Button Elastic or a hair tie  Step 1: Cut ...

Scrapbooking, Adore

    Every once in a while, I make a layout that I absolutely love and this is one of them.  I think it might be the rainbowness of it all that I love.  This is really a random photo of my daughter that I took while we were waiting for the bus.  I played with the photo on my phone and made it more rainbowy.  I really like how it came out, so I printed it out for my project life, but then I decided it needed its own page.  It really is a random page for a random photo.     This is my page for the Memory Nest . The circles on the sketch were my major inspiration.  I felt that they would make a fun background.  At first, I changed the circles to triangles and then I noticed all these old frames on my desk.  I'm a chipboard frame hoarder. lol.  I thought most of the frames were really ugly or they had patterns that I would never use.  At first, I was going to just paint the fram...

Scrapbooking, First Solo

I can't believe how much time has gone by since I last scrapbooked.  Well, I finally have been inspired to scrap again and I found a fun challenge with a very happy mood board that got my creative juices going again. Recently, my daughter got to dance her first solo on a stage.  I had only seen her dance this when she was first learning this.  She had a broken wrist at the time, so I never had seen some of the moves until she danced it on stage.  It had been over a year since she was on a stage and she has never been on one all by herself.  I wasn't sure how she was going to do.  I could tell she was getting nervous, but she did a beautiful job.  I was a very proud mommy.  =)  I really wanted to add one more picture, so I added this photo on a pull out tab.  I always enjoy the pages that have a little interactive part to them. While the paper I used for this layout was all new, all the embellishments are things that I have had for a lon...