
The Doll House

DSC_0448

So I recently came across a new blogging block...I ran out of room to upload photos.  Well, I finally came up with a solution and I'm up and running again.

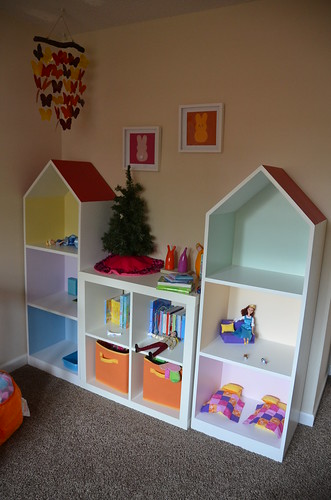
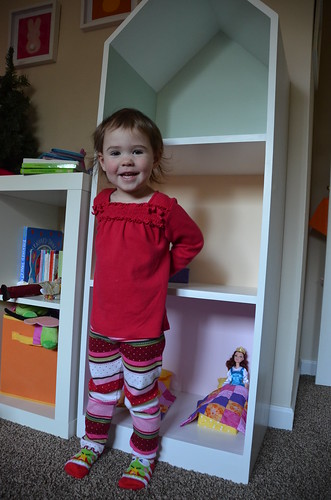
Moose received this awesome handmade dollhouse for her 2nd birthday back in August, but grandpa and grandma finally got them to the west coast a few weeks ago.  Boy did I forget how big they are!  They take up most of the space in her room.  She can barely see the top floor!
 
DSC_0457

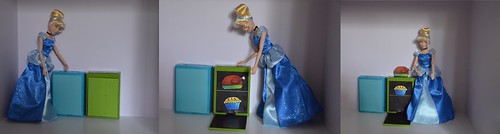
I've been slowly trying to make some furniture for this doll house.  I did some looking online and found a surprising lack of Barbie size furniture tutorials.  So I just kind of winged it.  I made a blue sink out of a chunk of wood.  I carved out a very shallow sink.  I also make a stove and that I used a bit more creativity.  I found the smallest hinge at the craft store I could find and made it so it could open.  Then I glued magnet sheet that I had onto both sides and then colored a turkey and a pie and glued those onto more magnet sheet.  So "Cinderbrella" as she is called in our house can do some baking.  I have plans for a purple fridge, but I will not get to working on that until after Christmas.
 
CINDERBRELLA

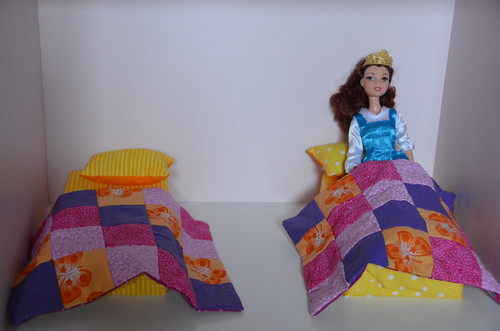
I also made two beds out of some leftover foam from the flower box I made in the beginning of the year.  I just wrapped the foam in fabric and hot glued it down.  I made the mini quilts and pillows reversible, but Moose likes them like this.  The beds are a tad short for the 12 inch dolls, but for the smaller ones they are perfect, so I'll have to get some more foam and make a few more larger beds.  I also made a couch out of the leftover foam, but it looks really sad so I didn't take any close up photos of it.   I'll have to make a more realistic one sometime in the future.
 
DSC_0454

Comments

  1. I had no clue your blog could run out of photo storage. I wonder if I'm getting close. I will need to research those limits.

    ReplyDelete
  2. The great article you have posted here. This is an effective method for expanding our insight. Keep sharing this sort of articles, Thank you.Commercial Indoor Playground Equipment

    ReplyDelete

Post a Comment

Popular posts from this blog

Valentine's Day Wreath

Now that the Christmas decorations are down, it is time to make some Valentine's Day decorations to put up! I have seen some in the store, but it is much more fun to make your own.  So here is how I made my sweet heart wreath. First you need a hoop (the one I used had about a 7 in diameter), 7 big wooden hearts, 8 small wooden hearts, paint, glitter, ribbon, and some hot glue. I took all my hearts and painted them a solid color and then went back over them and made some patterns or outlined them. I thought they were looking a little boring so I went back and put some glitter on random ones. Then I went around and hot glued the big ones and tried to make them as evenly spaced as possible. Then I hot glued the smaller ones on top of the bigger hearts, tied some ribbon, and then hung on my door!

Scrapbooking, First Solo

I can't believe how much time has gone by since I last scrapbooked.  Well, I finally have been inspired to scrap again and I found a fun challenge with a very happy mood board that got my creative juices going again. Recently, my daughter got to dance her first solo on a stage.  I had only seen her dance this when she was first learning this.  She had a broken wrist at the time, so I never had seen some of the moves until she danced it on stage.  It had been over a year since she was on a stage and she has never been on one all by herself.  I wasn't sure how she was going to do.  I could tell she was getting nervous, but she did a beautiful job.  I was a very proud mommy.  =)  I really wanted to add one more picture, so I added this photo on a pull out tab.  I always enjoy the pages that have a little interactive part to them. While the paper I used for this layout was all new, all the embellishments are things that I have had for a long time.  I used some old stickers, wooden

Scrapbooking, Adore

    Every once in a while, I make a layout that I absolutely love and this is one of them.  I think it might be the rainbowness of it all that I love.  This is really a random photo of my daughter that I took while we were waiting for the bus.  I played with the photo on my phone and made it more rainbowy.  I really like how it came out, so I printed it out for my project life, but then I decided it needed its own page.  It really is a random page for a random photo.     This is my page for the Memory Nest . The circles on the sketch were my major inspiration.  I felt that they would make a fun background.  At first, I changed the circles to triangles and then I noticed all these old frames on my desk.  I'm a chipboard frame hoarder. lol.  I thought most of the frames were really ugly or they had patterns that I would never use.  At first, I was going to just paint the frames white, but then I decided to make them gray.  I'm glad I made them gray because now they