
Nature Baby Mobile

NicolesBabyMobile1
 
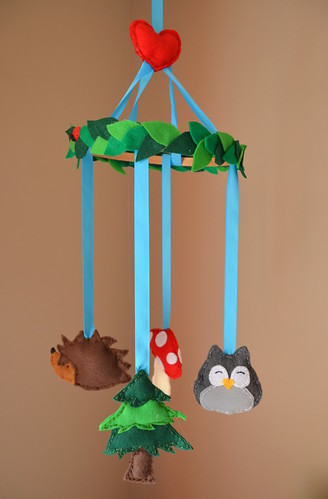
I'm really excited to share this really darling baby mobile that I made for my cousin.  It was a special request for mushrooms, pine trees, and hedgehogs.  I felt it needed an owl too.  If you know my cousin, then you know this woodland theme is totally her.  I really enjoy making these.  If anyone wants me to make them one, I would love to do it!  They are so relaxing to make.
 
After I made it, I wanted to compare it to ones I made in the past.  For my daughter I made this bunny mobile and a couple of years ago I made this bear mobile for my niece.  I noticed I only had four hanging things as apposed to the six I've made in the past, but each critter/thing is a bit more detailed.  I think it was due to the smaller wooden hoop.  I used a wooden one instead of a plastic one for a nature feel and the wooden was that I found was smaller.

NicolesBabyMobile2
 
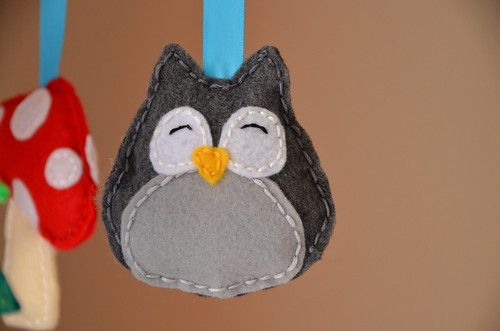
The owl is one of my favorites.  I had to make the gray floss since I didn't have any and didn't feel like going out to the craft store again in the same day.  I had been out earlier for more felt!  I used a copic N1 for the belly and N5 for the body.  I was surprised just how well it worked.  When I did eventally go back to the craft store, I couldn't find any gray floss that I liked.  They all looked more brown gray than a true gray.  I have this same issue with gray paint right now for my home.  Gray paint is  a bit blue or it is brown or it is purple.  What about a gray made from black and white?  Is that so hard to ask for.
 
NicolesBabyMobile3
 
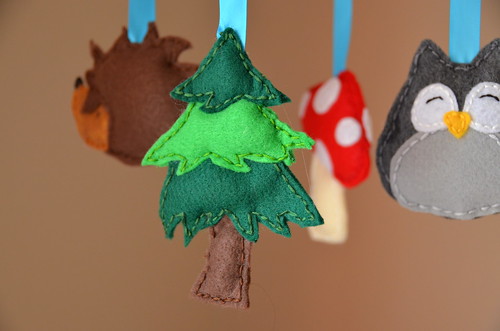
I tried to go for a more natural looking tree.
 
NicolesBabyMobile4
 
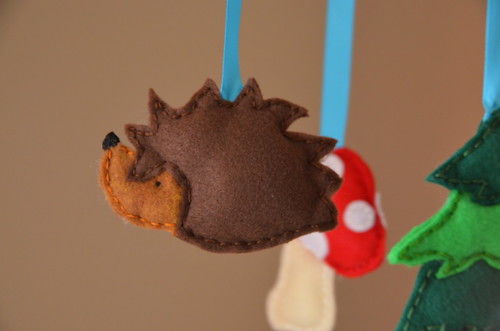
I love my hedgehog!  Normally, I draw on a piece of paper what I want to make first.  Then cut it out and trace it onto felt.  But with this little guy I just drew it right on the felt for part and they other part I just kind of free cut.  I'm really surprised just how cute he is.  He kind of has a surfer shag going on. lol
 
NicolesBabyMobile5
 
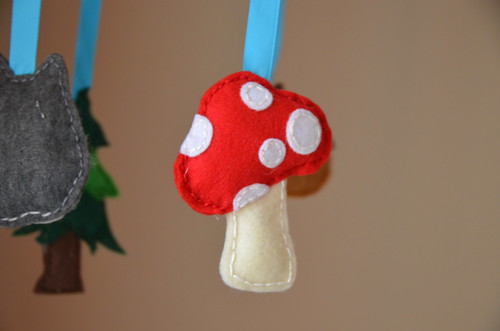
The mushroom was the first one I made out of all the parts.
 
NicolesBabyMobile6
 
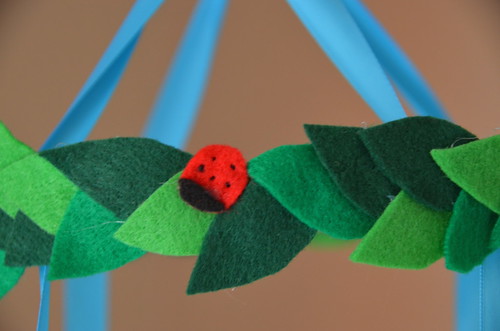
I decided to hide a little ladybug at the top for a bit of surprise!  It took me two tries to get an acceptable ladybug.

Comments

  1. This is ABSOLUTELY adorable and darling!! I am sure your cousin will LOVE it!! WOW!!!

    ReplyDelete

Post a Comment

Popular posts from this blog

Car Roll Tutorial

  November is such a crazy time.  There are so many projects that have to be made for birthdays and Christmas.  Making things is so much more fun then buying something random.  Anyways, I made this cute car roll for Moose's best buddy's 2nd birthday.  I'm loving how it came out and her friend has been having a blast putting his hot wheels in the little pockets.  So here is how I made it so you can make one too!  I don't have photos for every step because Moose was "helping" me the entire time and I couldn't juggle her and a camera very well.   Supplies: 1/4 of a yard of green fabric 1/4 of a yard of some fun print fabric Batting (about 16 inches by 9 1/2 inches) 5 Pieces of scraps of fabric at are 4 inches by 4 1/2 inches Felt for roads, dirt, and water (I used the felt rectangle pieces you see everywhere in craft stores) Bias Tape Button Elastic or a hair tie  Step 1: Cut ...

Scrapbooking, First Solo

I can't believe how much time has gone by since I last scrapbooked.  Well, I finally have been inspired to scrap again and I found a fun challenge with a very happy mood board that got my creative juices going again. Recently, my daughter got to dance her first solo on a stage.  I had only seen her dance this when she was first learning this.  She had a broken wrist at the time, so I never had seen some of the moves until she danced it on stage.  It had been over a year since she was on a stage and she has never been on one all by herself.  I wasn't sure how she was going to do.  I could tell she was getting nervous, but she did a beautiful job.  I was a very proud mommy.  =)  I really wanted to add one more picture, so I added this photo on a pull out tab.  I always enjoy the pages that have a little interactive part to them. While the paper I used for this layout was all new, all the embellishments are things that I have had for a lon...

Scrapbooking, Melt My Heart

  I've got one more rainbow inspired layout to share. This time I played along with Scrap Our Stash . I used the following five items up from the list. 1. Stripe Paper (I may have a rainbow stripe addiction when it comes to paper) 2. Paper Clip (the orange arrow at the top) 3. Wood Veneer (the cute arrow) 4. Flair (I've got two.  The circle heart from Amy Tangerine and the square sunshine from a Freckled Fawn Kit) 5. Enamel Dots (I've got a few green in one corner and a few orange in another)   I used a bunch of pop dots on this layout to keep some of the corners up and to give the clouds some layering.  I kind of forgotten just how handy those little things can be in giving depth to a page. I also decided to keep my journaling hidden since this page has so much going on pattern wise with no good breaks.