
Scrapbooking, Make a Wish

MakeAWish1
 
The past two months (actually more like three) have really been a whirl wind.  I can't remember what I've blogged about so here is the short version.  In March we found out our landlords wanted to sell the house we rented.  We looked at renting and buying.  Then we ended up buying our first house about two months ago.  We had to redo all the floors so it took two weeks before we could move in.  About a week after we moved in we had to fly to New York to throw a surprise 50th wedding anniversary for my parents.  It was a huge success.  We flew back and unpacked house for a few days before we flew again.  This time to Michigan for a wedding my daughter and I were in.  The little guy got sick.  We flew back and went to the dr.  Little guy is better.  Now I can finally enjoy my house and work on unpacking and getting some quality scrapbooking time in!  Woot!
 
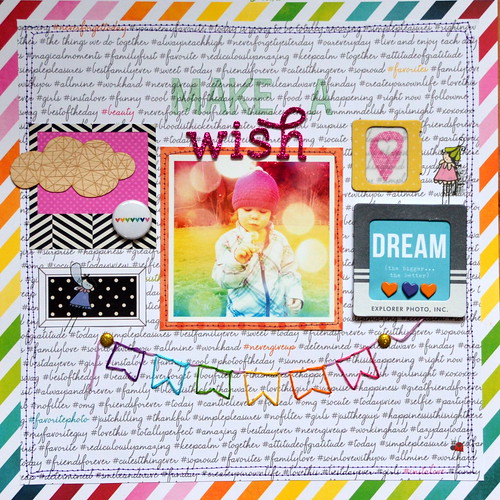
Now, I finally am able to work on some challenges.  I made this supper bright and happy page for The Paper Girls Rub-ons challenge.  I love rub-ons but never end up using them.  I used four on this layout!

makeawish2
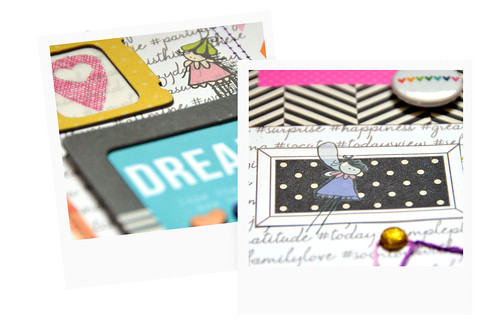
Two of the rub-ons were from some Heidi Grace fairy ones I've had for a long time.  I have had a hard time using them because they are just too cute.  I also used a relatively new heart geo tag one from Amy Tangerine.  I was actually really disappointed with how difficult it was to get that one to rub onto my page.  It definitely did not transfer well at all.  Major bummer.
 
makeawish3
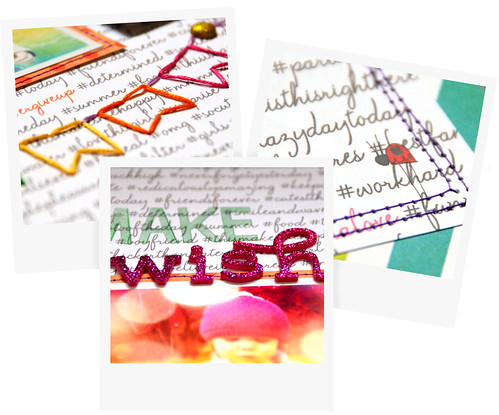
The last rub-on is the little ladybug in the lower right corner.  I wish I had a thousand more of those little guys that I could sneak onto ever single page I make!

Comments

  1. wow, this is an awesome layout! LOVE everything about it... and the rub ons are the perfect touch!

    ReplyDelete
  2. COOL! Love the rainbow colors!
    Thanks for joining us at Lasting Memories

    ReplyDelete
  3. Enjoy that house and relax now that things have hopefully slowed down. LOVE this layout! think I may be scraplifting it. So glad you linked up!!!

    ReplyDelete

Post a Comment

Popular posts from this blog

Scrapbooking, Adore

    Every once in a while, I make a layout that I absolutely love and this is one of them.  I think it might be the rainbowness of it all that I love.  This is really a random photo of my daughter that I took while we were waiting for the bus.  I played with the photo on my phone and made it more rainbowy.  I really like how it came out, so I printed it out for my project life, but then I decided it needed its own page.  It really is a random page for a random photo.     This is my page for the Memory Nest . The circles on the sketch were my major inspiration.  I felt that they would make a fun background.  At first, I changed the circles to triangles and then I noticed all these old frames on my desk.  I'm a chipboard frame hoarder. lol.  I thought most of the frames were really ugly or they had patterns that I would never use.  At first, I was going to just paint the fram...

Scrapbooking, First Solo

I can't believe how much time has gone by since I last scrapbooked.  Well, I finally have been inspired to scrap again and I found a fun challenge with a very happy mood board that got my creative juices going again. Recently, my daughter got to dance her first solo on a stage.  I had only seen her dance this when she was first learning this.  She had a broken wrist at the time, so I never had seen some of the moves until she danced it on stage.  It had been over a year since she was on a stage and she has never been on one all by herself.  I wasn't sure how she was going to do.  I could tell she was getting nervous, but she did a beautiful job.  I was a very proud mommy.  =)  I really wanted to add one more picture, so I added this photo on a pull out tab.  I always enjoy the pages that have a little interactive part to them. While the paper I used for this layout was all new, all the embellishments are things that I have had for a lon...

Car Roll Tutorial

  November is such a crazy time.  There are so many projects that have to be made for birthdays and Christmas.  Making things is so much more fun then buying something random.  Anyways, I made this cute car roll for Moose's best buddy's 2nd birthday.  I'm loving how it came out and her friend has been having a blast putting his hot wheels in the little pockets.  So here is how I made it so you can make one too!  I don't have photos for every step because Moose was "helping" me the entire time and I couldn't juggle her and a camera very well.   Supplies: 1/4 of a yard of green fabric 1/4 of a yard of some fun print fabric Batting (about 16 inches by 9 1/2 inches) 5 Pieces of scraps of fabric at are 4 inches by 4 1/2 inches Felt for roads, dirt, and water (I used the felt rectangle pieces you see everywhere in craft stores) Bias Tape Button Elastic or a hair tie  Step 1: Cut ...