

My daughter has lots of these little ponies that she likes to bring with her everywhere, so I thought I would make a roll so she can bring them with her in something more interesting then a Ziploc bag. This roll also works well for small dolls. The pony roll is very similar to my car roll, it just is a tad longer and has a 3-d house. I mostly just took photos of how I made the house, so feel free to refer back to the car post for more step by step pictures on the mat itself.
1/4 of a yard of green fabric
1/4 of a yard of some fun print fabric
Batting (about 17 inches (I liked the extra inch of wiggle room) by 9 1/2 inches) and some extra batting for the house
6 Pieces of scraps of fabric that are 4 inches by 3 1/2 inches
Felt for house, roads, tree, and water (I used the felt rectangle pieces you see everywhere in craft stores)
Velcro
Velcro
Bias Tape
Button
Elastic or a hair tie
Step 1:
Cut 2 17 inch by 9 1/2 inch rectangles. One should be of green fabric and the other a fun print for the outside of your roll. Cut 6 4 inch by 3 1/2 inch rectangles of fun fabric. I went for a rainbow effect.
Step 2:
Sew the 4 inch by 3 1/2 inch squares together to form a strip with a 1/4 seam allowance. Fold the top down and sew to make a nice hem so that each color rectangle is actually now a 3 inch square (mine ended up being 3 inches tall and 2 1/2 or 2 3/4 wide....they were far from perfect).
Step 3:
Line up the bottom of the strip with the long side of the green fabric and sew. See photo 1. Then sew down the sides of each color square to make nice pockets for the ponies.

Step 4:
Make your house and other elements.
The house, Step 4A:
- You want to cut four trapezoids for the sides (Two pieces for each side). One side should be 4 inches tall and the parallel side should be 3 inches tall. The bottom will be 3 inches long and connect the short and long side like in photo 2.
- The back wall will be a 3 (height) by 3 1/2 (width) inch rectangle and you need two pieces.
- The roof is 3 1/2 by 3 3/4 inches and you need two pieces.
Step 4B:
Sew any windows, bushes and other decorations onto your house before you sew the pieces together.
Step 4C:
Sew 3 sides of each of the pieces together (see photo 3) with a 1/4 seam allowance. Make sure you keep one edge open on each piece! I made it the bottom on mine and you can tell in photo 6.
Step 4D:
Cut batting and put it in each wall and roof.
Step 4E:
Sew the back wall and roof together (see photo 4 and 5). I place the wall piece inside the roof a little bit.

Step 4F:
Sew the walls onto the mat. You can tell how I did it in photo 7.
Step 4G:
Glue or sew some Velcro onto the house. I just put mine on the two slants of the house and on the roof. I didn't bother with the walls and it seems to be holding up just fine. Sorry there is no photo. I didn't have any Velcro at the time I was making this and had to add it on way later.
Step 4H:
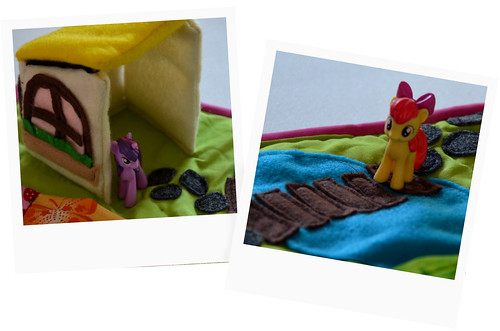
Sew on a lake, trees, path, bridge, or anything else you want in your pony world. As you can see in the photo below, I added a tree with little felt apples that can be taken off and placed into the basket.

Step 5:
Layer your top fabric (the one with the stuff on it), the batting underneath it, and the outside fabric (the nice side should face the table) to make a nice sandwich. Yummy. =) Then sew around all 4 side and you can go in about a 1/4 inch to even an 1/2 inch if you have wide enough bias tape to hide it.
Step 6:
The part I always forget to do is sewing down the elastic. To figure where you want it, you have to fold your piece in half and pick a half way between that fold. Or you could just do it 1/4 from the bottom, but I don't think like that. Sew it on really well. Ideally it would be sew on step 5, but why complicate things? =)
Step 7:
Now to figure out where that button goes...load up the ponies into all the pockets and fold that roll up. It will be fairly fat with the house in it too, but it will still work. Then see where that spot where the elastic would nicely go around a button and mark it. then unroll and sew your button on.
Step 8:
Sew your bias tape around the edge and your roll should be ready for some playing (see photo 8).
Please let me know if you have any questions!
Please let me know if you have any questions!
Very nice project!
ReplyDeletethanks for sharing!
http://freestilcreatingbyvilly.blogspot.gr
This is such a cute idea! And so great for on the go! Thanks for sharing. Come share at our Pattern Party starts the 1st of each month.
ReplyDeleteGet Your Crap Together
I have two boys, but I have to say that I'm rather smitten with this myself. Would it be odd for a 31 year-old woman to carry this little wrap around? Ha ha! What a great gift it would be for a horse loving little girl! :)
ReplyDeleteWe'd love for you to share this over at Much Ado About Monday, if you get a chance.
http://www.huckleberrylove.com/2013/06/much-ado-about-monday-no-12.html
~Emily
www.huckleberrylove.com
This is so ridiculously cute! I am obsessed with on-the-go toys and know lots of little girls who would love to have one of these. I am your newest follower. I hope you will follow me back at http://hoybycrafts.blogspot.com. Thanks again for this fantastic idea!
ReplyDeleteI LOVE this! My daughter is obsessed with her ponies. This would be great for our summer road trip. Do you think I could make one of these by next week ;-)
ReplyDeleteThis is a fabulous project! My little ladies would LOVE this!! Thank you so much for linking this up to Much Ado Monday. Just wanted to let you know that you have been featured, so make sure to stop on by and grab our 'I Was Featured' button. Congrats, you deserve it. :)
ReplyDeleteJamie
www.huckleberrylove.com
This is such a cute idea - I LOVE the little house!
ReplyDeleteThanks for linking to a Round Tuit!
Hope you have a fabulous week!
Jill @ Creating my way to Success
http://www.jembellish.blogspot.com/